2/16/2026 Youtube Video Summaries using Grok AI, and Copilot AI
The transformation of wood waste into Medium-Density Fiberboard (MDF) is a remarkable example of industrial recycling and sustainability. Globally, massive amounts of wood waste—from construction debris, demolished buildings, discarded furniture, and wooden pallets—are generated each year. Without efficient recycling, this material would overwhelm landfills, contribute to pollution, and accelerate forest depletion. Instead, advanced facilities turn this "trash" into high-quality MDF boards used in furniture, cabinetry, interior panels, and construction.
Modern recycling plants handle impressive volumes: a large facility might process up to 100 tons of wood waste daily, with roughly 80% deemed suitable for recycling after careful sorting. Only clean, high-quality wood proceeds, optimizing energy use and final product quality.
Step 1: Collection, Sorting, and Initial Preparation
Wood waste arrives from diverse sources and is first sorted to separate recyclable material from contaminants like plastics, stones, or treated wood. For pallets specifically, automated robots quickly disassemble them—pulling apart boards and removing nails in seconds—turning bulky items into usable planks.
The sorted wood is fed into powerful chipping machines that shred large pieces into a continuous stream of wood chips on conveyor belts. These chips then pass through metal separators (using strong magnets) to extract nails, screws, or other metal impurities, yielding clean wood chips.
Step 2: Refining into Fibers
The chips move to grinding or refining equipment, where they are broken down into fine wood fibers. A key piece of machinery here is the screening system, which filters out larger particles, retaining only fibers smaller than about 0.5 mm—the ideal size for uniform MDF production. Additional cleaning removes remaining dirt, bark, or other impurities. This fiber preparation stage is critical: it directly impacts the strength, density, and overall quality of the finished boards.
A typical plant might process around 10 tons of wood into fibers daily.
Step 3: Drying the Fibers
Wood fibers still contain moisture from their original state or processing. Excess moisture can cause issues like poor bonding, warping, or future mold growth. To prevent this, fibers enter large rotary drum dryers—essentially giant, rotating ovens. Hot air (at 150–200°C) circulates through the tumbling chips, evaporating moisture evenly without scorching the material. These dryers handle high throughput, such as 5 tons per hour, ensuring consistent low moisture levels essential for durable MDF.
Step 4: Resin Blending
Clean, dry fibers are mixed with resin—most commonly urea-formaldehyde—chosen for its strong adhesion, low cost, and water resistance. Modern high-capacity mixers coat every fiber evenly in minutes. Resin typically makes up 8–10% of the final board's weight. A large plant might use hundreds of tons of resin annually. This step determines key properties: board strength, load-bearing capacity, termite resistance, and overall durability.
Step 5: Hot Pressing – The Core Transformation
The resin-coated fibers are formed into mats or layers and fed into massive hot press machines. Under extreme conditions—temperatures up to 200°C and pressures around 30 megapascals—the mats are compressed for 5–7 minutes. The heat activates the resin, binding fibers into a solid, dense panel. Thickness varies (typically 6–25 mm), tailored to customer needs. A high-output facility can produce tens of thousands of boards monthly, sometimes up to 100,000.
Step 6: Finishing and Quality Control
After pressing and cooling, boards undergo:
- Precision cutting with industrial saws to standard sizes (e.g., 1.2 m x 2.4 m).
- Sanding using high-speed belt sanders that smooth surfaces rapidly—far more efficiently than manual methods.
- Optional surface finishing, such as applying melamine coatings or thin wood veneers for aesthetics, scratch/moisture resistance, and up to 30% longer lifespan.
These steps produce polished, ready-to-use MDF boards.
Environmental and Broader Impact
Recycling wood waste into MDF is a powerful sustainability win. For every ton of recycled wood used, roughly 0.8 tons of CO₂ emissions can be avoided compared to virgin production (though exact figures vary by study and process). Overall, wood-based panel recycling reduces emissions by around 30% versus making new boards from fresh timber. It conserves forests, diverts waste from landfills, and creates a near-closed loop—off-spec MDF can often be reprocessed.
In essence, what begins as discarded, "ugly" wood ends as versatile, eco-friendly material powering modern design and construction. This process showcases innovation: turning waste into value, reducing environmental harm, and promoting a circular economy. Every recycled board represents a step toward a greener future—one where materials get multiple lives, and hope for sustainability is quite literally rebuilt.
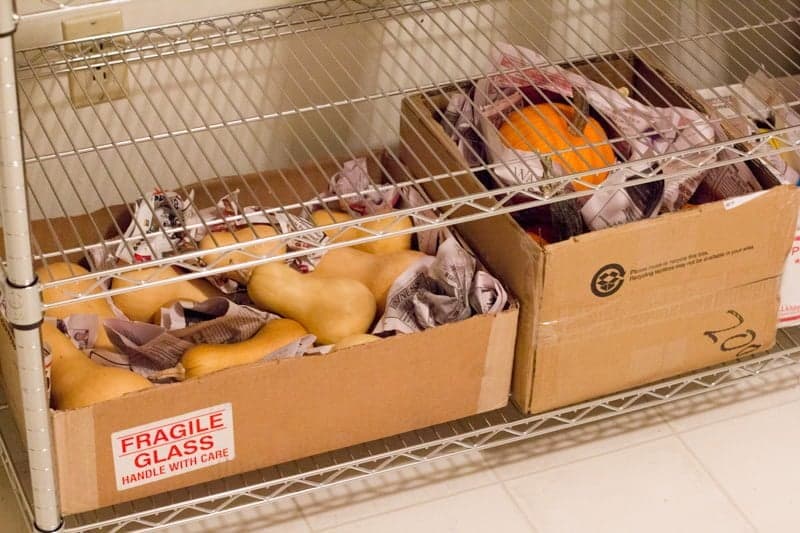
A family of six on a homestead in a renovated 1950s ranch house has turned their unfinished basement into an effective (if not perfect) storage space for homegrown storage crops. After a bountiful harvest—including winter squash, cabbage, carrots, beets, potatoes, sweet potatoes, corn, and beans—they've organized their setup to feed the family through winter and beyond, often lasting months or even a full year.
The key to success? A cool, dark basement (hovering around 55–60°F in winter), heavy-duty storage racks, spare fridges/freezers, and simple techniques like curing, proper ventilation, and avoiding light/moisture issues. They recently decluttered the basement—clearing boxes, projects, and random items—to make it functional again, creating dedicated zones for food storage. This overhaul was motivated by an upcoming harvest and a family garage sale deadline.
Overall Storage Setup
- Heavy-duty racks (like Gladiator brand, ~6 ft long x 2 ft deep shelves) hold most crops in bins or laid out directly. These sturdy units support heavy loads (50–100 lb bins) and last for years.
- Spare fridges — one in the garage, one in the basement — store humidity-loving roots like carrots, beets, and cabbage. Freezers (including stand-up for beef cuts and chest for whole chickens) hold frozen fruits, berries, home-raised beef, and meat chickens.
- Basement pantry houses canned goods (tomato sauce, applesauce), 5-gallon food-grade buckets with gamma lids for dry beans and corn (with oxygen absorbers for extra safety).
- Deep freezers preserve meat from their annual cow and 50–60 chickens.
Energy costs exist for extra appliances, but most were acquired free or cheap (e.g., $30 max via Marketplace). No backup generator yet, though considered for power outages. Rodent control uses bait stations and daily checks—no major issues so far.
:strip_icc()/BHG-Root-Vegetable-Cellar-Storage-521542326-cb70390eb975408ca7a0ec7a42213749.jpg)


Harvest and Preparation Highlights
Harvest spanned mid-September through late fall, with a mid-harvest Hawaii vacation break that spaced out tasks nicely (e.g., curing potatoes).
- Sweet potatoes (Bayou Bell variety, ~150–200 lb): Prioritized due to frost risk. Dug carefully around plants to pull clumps intact, minimizing damage. Laid unwashed in a single layer on tables/racks to cure 1–2 weeks (cool/dry basement works; ideally warmer 80–85°F for best sweetening). Snapped off soft/rubbery ends to prevent spoilage. Stored in breathable black plastic food-grade bins (great airflow; sourced used from farmers or similar via Marketplace/Craigslist). Aim for 55–60°F long-term—perfect basement match. Expect several months' storage.


- Butternut squash (~150 total, far more than expected): Favorite for taste (sweet, creamy) and storage. Harvested before frost. Cured unwashed in single layer on wire racks (not touching) for weeks in cool, dark, dry basement to thicken skins/heal blemishes. Kept on racks long-term for easy inspection—bigger/more mature ones store best (up to a year). Eat smaller/less ripe first.
- Potatoes (including storage champ Elba whites): Harvested last. Laid unwashed in single layer (on old doors propped as extra space) to cure 2–3 weeks—thickens skins, heals damage. Covered with bed sheets to block light (prevents greening/solanine toxin). Basement 55–60°F is okay short-term but ideal is 40–45°F; planning a CoolBot-insulated closet upgrade. Store in bins; eat damaged ones first.
- Cabbage: Cut heads at base, bagged unwashed, refrigerated (garage fridge for short-term; beware freezing in deep cold). Lasts ~1 month fresh; later fermented into sauerkraut (counter-ferment 1–2 weeks, then fridge). Provides year-round fermented benefits.
- Carrots & beets: Mid-September harvest. Bagged unwashed, refrigerated—stay crisp months into spring.
- Beans (~3 gallons shelled): Fun family task. Switched from hand-shelling (months-long) to pillowcase method—fill old pillowcase ~1/3 with dry pods, whack firmly (not too hard) against hard surface to split pods, stir/mix between rounds. Kids "hunt" missed beans in shells. Winnow chaff with fan by pouring between bowls. Store dry in 5-gallon buckets (gamma lids for easy access).
- Corn (Wakan Green Dent): Shucked (ideally right after harvest; delayed here), shelled with hand-crank sheller (hour or two vs. full day by hand). Husks to chicken bedding. Stored whole kernels in buckets; grind to cornmeal as needed—lasts years.
Tips and Future Goals
- Never wash storage crops (except when ready to use)—moisture invites rot.
- Ensure airflow (no plastic bags for squash/potatoes/sweet potatoes).
- Separate onions from potatoes (gases speed sprouting).
- For no-basement homes: Get creative with root cellars, extra fridges, or more preserving (canning, dehydrating, freezing).
This system—built on trial-and-error over four years—turns a modest homestead into a year-round food source. As one homesteader puts it: some buy lottery tickets; they plant potatoes. The result? Abundance, self-reliance, and meals from their own land all winter long.
The "ASSESS" framework is a practical, six-step system for quickly spotting "bad land"—properties that appear attractive or like a bargain but hide major, costly defects that can destroy value or make development impractical. Bad land often conceals flaws just enough to lure buyers in, but these issues usually fall into one of six physical categories. Checking them first (before diving deep into zoning, utilities, or comps) saves time and money. The acronym ASSESS stands for:
- Access
- Soil
- Slope
- Environmental
- Street view
- Satellite view
Use tools like county GIS maps, USDA soil surveys, Google Street View/Satellite, or specialized platforms (e.g., Land Portal) to evaluate from your desk—often in minutes.
1. Access (Legal + Physical)
Can you legally reach the property without trespassing? More importantly, can you physically drive there reliably now and long-term? Example: A seemingly idyllic 10-acre pond-front lot in Virginia with a private driveway through a subdivision. It appeared worth far more than the $160K contract price (nearby comps $270K–$375K for smaller lots). But the driveway crossed an unengineered, crumbling dam not built for vehicles. Fixing it (re-engineering for weight-bearing, erosion control) could cost hundreds of thousands—more than the land's value—plus regulatory hurdles in a strict county. If the dam fails, flooding renders the property inaccessible or unusable. Lesson: Poor physical access can slash 70–80% of value. Always verify long-term drivability, easements, and infrastructure burdens.


2. Soil
Soil determines ~80% of rural land value in septic-reliant areas—due to drainage and depth for wastewater treatment. Example: A ~6-acre parcel in North Carolina with good road frontage, seemingly subdividable into multiple lots (~$75K+ potential as one homesite or more). Soil maps revealed mostly "Johnston loam" (very poorly drained, swampy/wetlands). High water table blocks standard septic drain fields. The only drier strip had a neighbor's illegal driveway encroachment. Result: Likely non-buildable without expensive alternatives (mound/aerobic systems still need minimum soil standards; holding tanks cost $5K–$6K/year to pump). Value drops to $12–15K (maybe to the encroaching neighbor). Lesson: Check USDA/soil series maps for depth, drainage, and wetlands. Even engineered systems have limits and high costs/maintenance. Always confirm with a soil scientist before closing.


3. Slope
Terrain affects foundation, driveway, and site prep costs. Extreme slopes (>15% grade) make building far more expensive. Example: A 1-acre lot in Alabama's Rainbow City subdivision—nice views, paved roads, valuable nearby homes. Listing hinted at "steep slope," but contour maps showed ~45% average grade (99% extreme). Building a foundation/driveway could add $50K–$100K+ in engineering/fill—costs not supported by local values. Lesson: Aim for <10–15% grade at home/driveway sites (gentle 0.5–1% helps drainage without extremes). Steep land often stays vacant for good reason.

4. Environmental
Look for wetlands, flood zones, riparian setbacks (buffers around waterways), or invasives. Example: Four lots in South Carolina near a creek—charming water feature, but imposed 50–100 ft setbacks, limiting buildable area. Bonus issue: Kudzu (invasive vine) overgrowth required years/$4,500+ eradication. Combined with marginal soils/high water table, too many constraints/costs. Lesson: Creeks/rivers trigger buffers; invasives add expense/time. Flood zones are obvious red flags.


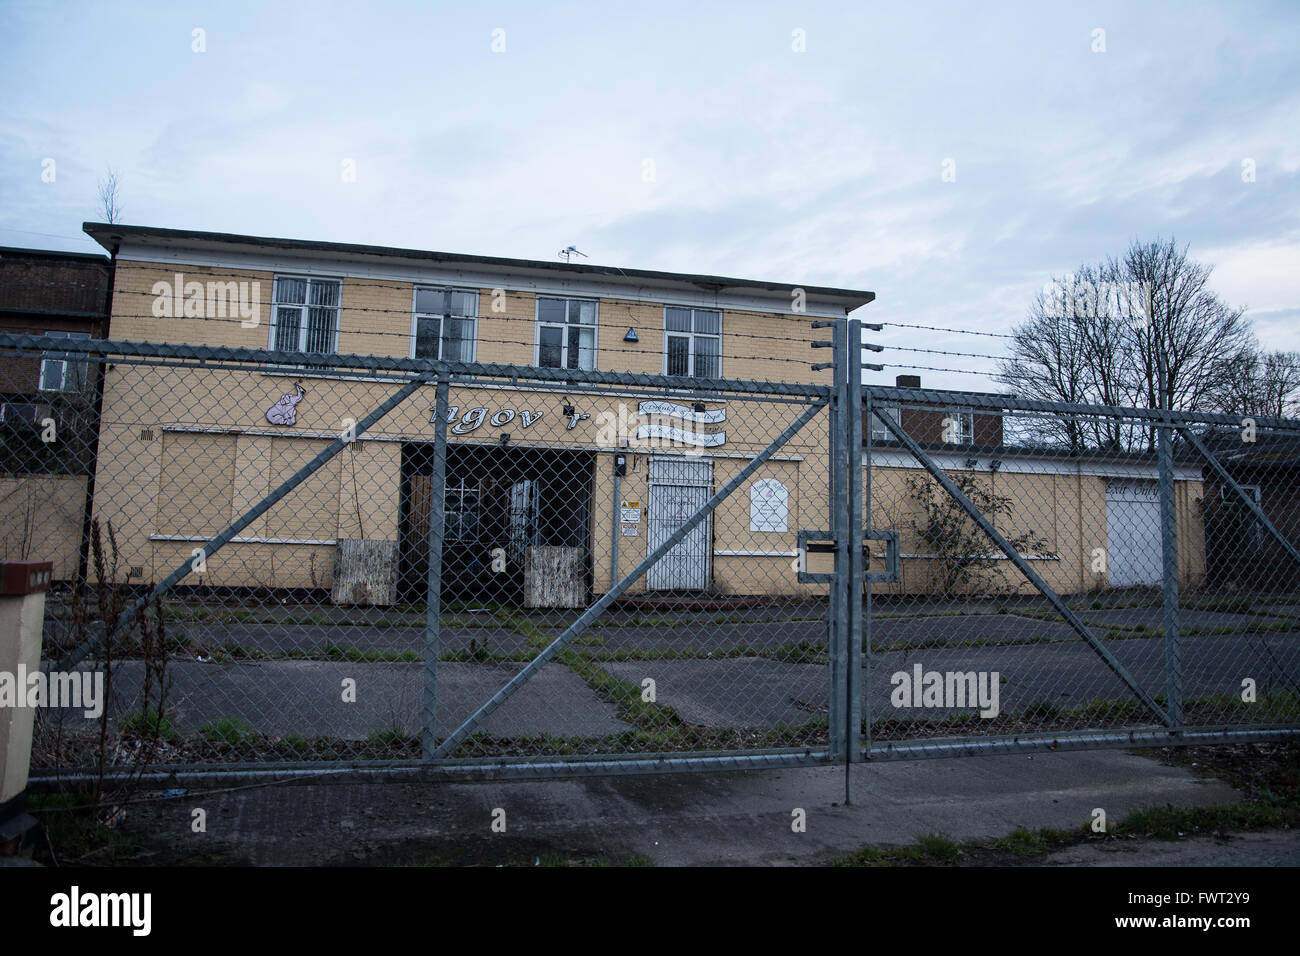
5. Street View
Provides qualitative "feel"—neighborhood ambiance, entrance, surroundings. Example: A small cleared lot in Georgia with paved frontage/utilities—looked promising for commercial/industrial. Street View revealed dilapidated warehouses, scrapyards, barbed wire, abandoned vibes—dystopian industrial decay. Fine for niche uses, but off-putting for most buyers/residential. Lesson: Desktop Street View reveals what photos hide. It's often the single most revealing free tool.

6. Satellite View
Zooms out to spot hidden nuisances—landfills, industrial farms, quarries. Examples: A nice-looking 2-acre lot in California near million-dollar homes—$375K asking. Satellite revealed proximity to a massive active landfill (trash mounds, trucks). Hog farm adjacency in North Carolina showed manure lagoons—odor/pollution risks. Lesson: Perception kills value (health concerns, resale stigma). Zoom out to see neighbors you can't spot from the road.


Quick Demo: Spotting Good Land
In a timed 60-second challenge on a 13-acre North Carolina farmland tract:
- Access: Paved county road—good.
- Soil: Favorable sandy loams—good.
- Slope: Flat—no issues.
- Environmental: Minor stream (amenity, not constraint)—no flood/wetlands problems.
- Street View: Nice homes/neighborhood.
- Satellite: Well-kept area, close to town—good. Result: Passed in 59 seconds.
Bottom line: Use ASSESS first to filter out bad land fast. It focuses on intrinsic physical flaws that kill deals or value. Once cleared, move to utilities, zoning, etc. (covered in related resources). This prevents overpaying or chasing losers—prioritize properties that pass quickly, then value them accurately. Bad land hides; ASSESS exposes it
A pipefitter shares a casual, real-world lesson from the jobsite (filmed at Schofield Welding) on calculating takeoffs—the adjustments subtracted from center-to-center measurements to determine the exact cut length of pipe needed when fittings are involved. This ensures pieces fit perfectly during fabrication or installation without excess or shortage.
The example comes from an isometric drawing (ISO) showing a section with:
- A 3-inch, 600-pound flange (high-pressure rating).
- A 3x3 equal tee (branch same size as run).
- A reducer swelling onto the tee (likely concentric, connecting to the flange side).
Quick Takeoff Basics
Takeoff = the "extra" length the fitting occupies beyond the pipe ends. You subtract these from overall center-to-center (or face-to-face) measurements to get the true pipe cut length.
Common tools/resources:
- Pipefitter's Blue Book (or "blue book") — pocket reference with standard dimensions for fittings by size, class, and type.
- Tape measure for quick field checks (run it straight through the fitting for approximate takeoff).
- Calculator for subtracting fractions safely.
Step-by-Step Breakdown from the Video
- Flange takeoff:
- For this 3-inch 600# flange, he measures straight through it with a tape: 3.5 inches (3½").
- This is the distance from one weld end (butt weld prep) to the raised face (or effective length the flange adds).
- Confirmed via tape; he notes heat numbers/ID markings on the flange verify it's 3" 600#.
- Tee takeoff (for equal 3x3 tee):
- Run tape through the tee (run to branch centerline): measures 6¾ inches.
- Half of that = 3⅜ inches (3 and 3/8").
- This is the takeoff from center of run to face of branch weld (or center to end).
- Rule of thumb: For equal tees (branch = run size), this method works reliably. For reducing tees (e.g., 3x2), check the book as dimensions differ.
- He double-checks against the Blue Book for accuracy.
- Reducer:
- Mentioned as "swells" right onto the tee (likely a concentric reducer enlarging or transitioning).
- Not heavily detailed, but it attaches directly, so its contribution is minimal or included in the pup piece.
- Putting it together — Calculating the pup piece:
- Scenario: A short "pup" (short pipe nipple) connects the tee branch to the flange.
- Measured center of tee to face of flange (on drawing/ISO): 29 feet 6 inches.
- Subtract tee takeoff (center to weld face): - 3⅜ inches.
- 29' 6" - 3⅜" = 29' 2⅝" (intermediate step).
- Then subtract flange takeoff: - 3½ inches.
- Final pipe cut length: 28 feet 11⅛ inches (from weld to weld).
- He uses a calculator for precision on fractions: "29 feet 6 inches minus 3 and 3/8... then minus 3 and 1/2."
Visual flow (simplified):
- Tee run → Tee branch takeoff (3⅜") → Pup pipe (calculated length) → Flange takeoff (3½") → Flange face.
Why This Matters
Accurate takeoffs prevent:
- Pipes too short (gaps, rework).
- Pipes too long (trimming in field, waste).
- Misalignment during welding or bolting.
He emphasizes field verification (tape through fitting) + book lookup for reliability. Technology (calculators) helps with math, but understanding the "why" is key.
Tips from the Video & General Pipefitting Practice
- Always verify fittings match the spec (e.g., 600# for high-pressure).
- For reducing fittings, always consult the Blue Book—rules of thumb vary.
- Add small allowances if needed (e.g., weld gaps ~1/16–1/8", gaskets for flanged joints), though not mentioned here.
- Share knowledge: He shouts out welders who liked his whiteboard explanations and encourages sharing the video.
This hands-on demo keeps it simple and practical—perfect for apprentices or anyone refreshing takeoff skills on butt-weld/high-pressure setups. From Schofield Welding: "We love you guys... see you next time!"
This video provides a detailed walkthrough of the plumbing system in a 7,200 sq ft high-end luxury home at 45 White Oak, from the 2-inch municipal water line entry to the 4-inch sewer out. Hosted by the builder with plumber Jim from Lavalle Systems, it covers initial planning, key components, high-quality installation practices, fixture considerations, energy efficiency, leak prevention, and winterization—emphasizing coordination, craftsmanship, and long-term functionality in a fully electric home.
Water Entry and Mechanical Closet (Basement)
Water enters via a 2-inch copper line from the street, stubbed into a dedicated water mechanical closet under the staircase (chosen for accessibility and to avoid long under-slab runs that risk unmetered tapping). Reasons for 2-inch: high demand from square footage (town bylaw), potential future fire protection, and better volume despite no sprinklers required.
- Constant pressure pump (Little Giant model): Addresses low street pressure, delivering steady output (no fluctuations like old well systems). Benefits: consistent showers (no pressure drop when flushing), better irrigation performance (more heads, even coverage), and overall comfort.
- Two meters: One for domestic use (billed for incoming + sewer removal); separate irrigation meter bypasses sewer charges on outdoor water (avoids double-billing for non-returned water). Helps during droughts/water bans.
- Expansion tank + check valve: Handles thermal expansion from heated water (prevents over-pressurization). Diaphragm absorbs excess; relief valve dumps if needed. Essential with one-way check valve blocking backflow to main.
- Copper in closet: Rigid, aesthetic (polished/waxed for visible "artistic" craft). PEX (plastic) used house-wide for flexibility/ease.
Mechanical Room and Water Heating
Transition to mechanical room (floor prepped for coating). Emphasis on neat, professional install—pipes aligned, labeled (red = hot, blue = cold for idiot-proofing; white = brand-specific Viega PEX).
- Heat pump water heater (hybrid electric): 2–3x more efficient than standard electric (uses refrigeration like mini-splits to pull ambient heat; lower carbon footprint, no gas emissions). Pros: ~70% less electricity, big savings (potentially $500+/year for family of 4–5), eco-friendly. Cons: Slower recovery (less hot water at peak demand vs. gas), needs warm space (40–90°F), may require lifestyle changes (shorter simultaneous showers). Prepped for recirculating pump to deliver instant hot water (loop to furthest fixture, multiple returns possible in large homes). Reduces wait times and waste (e.g., dumping cold water down drain).
- Manifold system: Like an electrical panel—central distribution with individual shutoffs per fixture/room for easy isolation.
Fixtures and Wet Walls
High-end Vola fixtures (wall-mounted faucets, pot filler, etc.) require precise rough-ins.
- Wall-mounted faucets (e.g., pantry): In-wall valves need extension kits for tile/finish adjustments (yellow/red zones indicate safe vs. error ranges). Adjustable for last-minute changes; leak detection at main shuts house water if issues arise (app alerts, great for traveling owners).
- Pot filler (kitchen exterior wall): Placed in well-insulated cavity (5.5" interior + exterior) to prevent freezing. Strongly encouraged for avid cooks (convenient for pasta/stock).
- Island sink: Uses bow/loop vent (U-turn under cabinet; vent rises high, returns down to drain). Requires inspector approval; includes cleanout/relief. Allows venting without nearby wall stack.
- Refrigerator/ice maker: Accessible shutoff in pantry wall (avoids pulling heavy fridge, reduces snap risk).
- Dishwasher: Convenient shutoffs/service points for appliance techs.
- Outdoor kitchen sink: Isolated line (not on recirc); winterized annually (drain + antifreeze in trap). Aquor frost-free hose bibs (stainless steel, quick-connect, flush-mount sleek look; stem shuts 12" back inside envelope for freeze protection + drip-out on disconnect).
- Primary bath (blue marble wet room, 6x12–13 ft, 13-ft ceilings): Careful valve/placement for body sprays/handheld; conservative flow to avoid rapid depletion. Kohler Tea-for-Two tub (large volume). Stubs copper at vanity for rigidity (bolted to framing; stronger than PEX alone).
- Wall-hung toilets: Cleaner (easy floor mopping), space-saving, modern look. Key: rigid backing (tile/Durock + blocking), full lagging, height adjustable (comfort height standard; customize per user).
Laundry Room (Second Floor)
Above kitchen (protects wood ceiling below).
- Killarney zero-entry stainless pan (trench drain front; 1" lip, flush with subfloor). Catches small leaks/condensate (washer, HVAC, water heater). Drains by gravity to basement indirect trap (air gap prevents backup; trap primer or year-round condensate keeps sealed).
- Leak detection: Sensor in pan shuts valves + alarms (audible/app). House-wide system as backup (flow-based anomaly detection auto-shuts if unanswered). Recessed shutoffs with access panel for resets (aesthetic + functional).
Additional Notes and Maintenance
- Garbage disposals: Risk of clogs (grease/buildup in 1.5–2" lines). Flush thoroughly (fill sink + run) or maintain professionally. Ice/Dawn/lemon trick may help scour (anecdotal).
- Boiling water down PVC: Safe (pipes rated; cools in trap), but run cold simultaneously to dilute/prevent buildup.
- Overall philosophy: Set high expectations early (neatness, coordination with other trades). Early involvement, clear decisions, and education on trade-offs (efficiency vs. peak demand). Focus on prevention (leaks, freezing), serviceability, and sustainability (recirc, heat pump, meters).
This system blends luxury (instant hot water, high-end fixtures, outdoor conveniences) with practicality (leak protection, winter prep, energy savings) in a cold-climate, all-electric build. Coordination between builder, plumber, and other trades ensures everything aligns for long-term performance.
The real estate search landscape is shifting dramatically, driven by Compass—now the largest U.S. residential brokerage after its $1.6 billion acquisition of Anywhere Real Estate (owner of brands like Coldwell Banker, Century 21, Corcoran, Sotheby's International Realty, and others) in early 2026. This merger combines massive agent networks (hundreds of thousands) and market share (around 25% of U.S. home sales volume), amplifying Compass's push for exclusive, private listings that aren't fully visible on public platforms like Zillow.
Many homebuyers assume Zillow shows every available property, but that's increasingly untrue. Compass (and others copying the model) markets select homes through a "three-phase" strategy: starting as "Private Exclusives" (visible only to Compass agents/clients for early offers/testing pricing), then "Coming Soon," and finally on the MLS for broad exposure. These private phases keep listings off Zillow and similar sites during the initial period, creating a pool of "hidden" inventory—hundreds or thousands in major markets like Austin, Los Angeles, and New York City.
This fragmentation echoes the "streaming wars": just as Netflix lost its monopoly when studios pulled content to their own platforms (Disney+, Paramount+, etc.), real estate listings are splintering. Compass pitches this as a premium perk—"VIP access" to off-market or early-look homes—encouraging buyers to work exclusively with their agents. The more brokerages Compass absorbs, the larger its private database grows, potentially forcing buyers to choose agents based on brokerage affiliation to access certain properties.
Zillow's response: In 2025, it introduced Listing Access Standards (the so-called "Zillow ban"), refusing to display listings marketed publicly elsewhere (e.g., brokerage sites, yard signs) for more than one business day without MLS submission. Zillow argues this promotes fairness: "If a listing is marketed to consumers, it should be online everywhere." It protects an open marketplace and prevents brokers from withholding inventory to steer traffic to their own sites.
Compass sued Zillow in federal court (June 2025), alleging antitrust violations—claiming Zillow abuses monopoly power (with Redfin allegedly conspiring) to crush competition and protect ad revenue (Zillow profits heavily from selling leads to agents). Compass sought a preliminary injunction to block enforcement.
Outcome (as of February 2026): A New York federal judge denied Compass's injunction request, allowing Zillow's policy to continue while the full case proceeds. The court found insufficient evidence of monopoly power, anticompetitive conspiracy, or irreparable harm to Compass. Zillow hailed it as a "clear victory" for consumers and transparency. Compass vows to fight on, but the ruling favors broad visibility over exclusive silos—for now.
Why This Hurts Buyers
- Reduced transparency — You miss deals on Zillow/Realtor.com, especially in cooling markets like Austin (prices down 20%+ recently).
- FOMO and fragmentation — Exclusive access ties you to one brokerage; switching agents mid-search risks legal issues (e.g., buyer-broker agreements).
- Power shift — Revives agent gatekeeping (pre-Zillow era, buyers relied on agents for MLS access). Now, brokerage choice determines what you see.
- Potential resale/offer disadvantages — Sellers may get lower exposure if listings stay private too long.
Zillow still shows most MLS listings and fights to keep inventory centralized (it loses users/market share if buyers flock to brokerage sites). But if more firms adopt Compass's model, public portals become less comprehensive—pushing buyers toward specific agents/brokerages.
Bottom line: Zillow isn't the complete one-stop shop anymore. For the fullest picture, combine Zillow with direct agent outreach (especially Compass-affiliated in key markets), check brokerage sites, and watch this legal saga—it's reshaping how Americans hunt homes in 2026 and beyond.
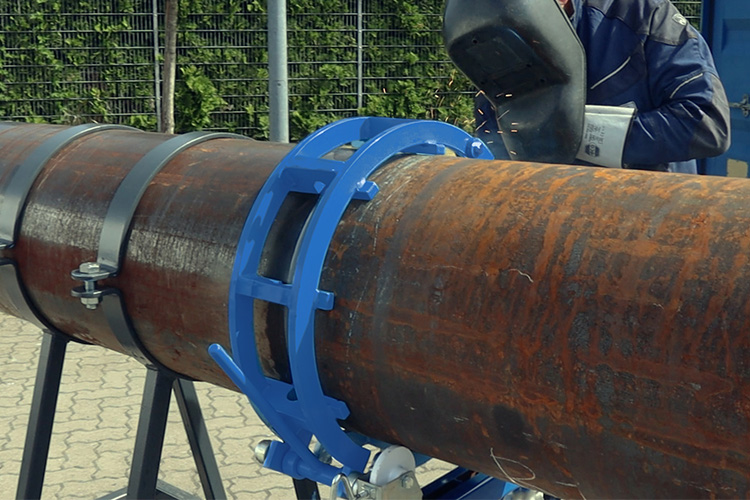
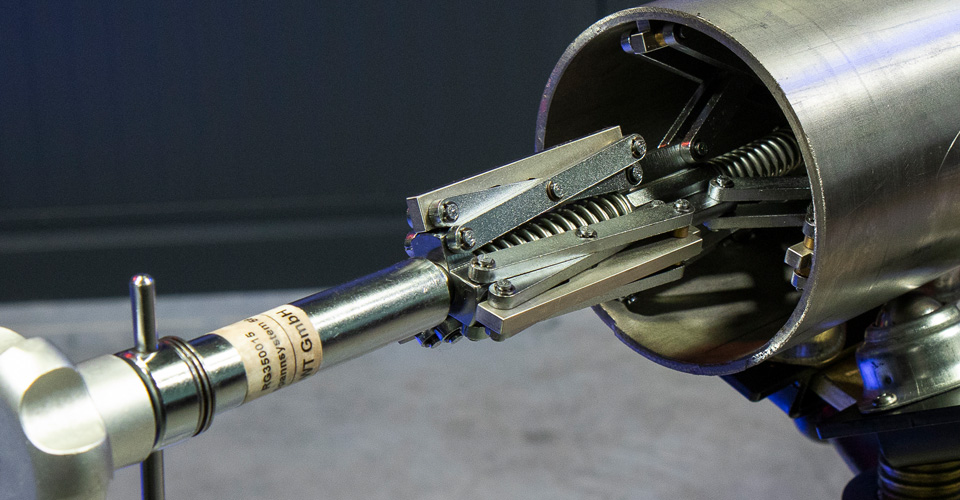
David Cerisa, a pipefitter/welder with 15 years in the trade, walks through the basics of pipefitting on a 6-inch standard-wall pipe spool: preparing bevels, fitting a flange, squaring/leveling, and attaching a 90° elbow. The focus is on clean prep for TIG welding (root pass), precise alignment (ID/high-low critical), and safe tool use.
1. Preparing the Pipe End (Bevel & Cleanup)
Start with a factory-beveled 6-inch pipe on jack stands.
- Clean first: Use an end grinder (with flat disc) or burr bit to remove paint, scale, rust from outer ~1 inch and inner ~½ inch. Avoid grinding too far—keeps contaminants away from weld zone.
- Refine bevel (standard 37.5° angle): Factory end has a small landing (flat inner edge). Grind it off with a 4-inch angle grinder at matching angle until sharp. Safety: Direct sparks downward, rotate pipe.
- Smooth finish: Switch to flap disc to erase grinder marks—leaves clean, professional edge.
- Sharp edge warning: Fresh bevel is razor-sharp—handle carefully to avoid glove cuts.
- Check squareness: Use a 2-foot pipefitter square (or framing square). Place along pipe axis, check inner bevel edges touch evenly at 0°, 90°, 45°. Adjust if off.


2. Preparing & Fitting the Flange
Flange (6-inch 150# A105, per B16.5) arrives painted.
- Clean: Wire wheel removes paint; flat disc/flap disc smooths bevel/inside/outside. Protect flange face—keep off spatter/burrs on tables.
- Support & align: Use a jack (lock nut/washer prevents drops) to hold flange square. Prioritize ID alignment (inside bore) over OD—critical for good root weld. Feel inside or use high-low gauge.
- Clamp & gap: Fit-up clamp (adjustable nuts on flange edge) holds position. Set ~5/32" or 1/8" gap with spacer (all edges touch evenly). Check high-low (<1/32" ideal).
- Tack: TIG (7DS6 1/8" wire, ~80 amps on XMT 350). Place ~1-inch tacks (big enough to hold, small enough for minor adjustments). Remove clamp, level pipe (magnets/level), tack opposite sides. Use wedge if needed for fine tune.
- Square check alternatives: If leveling impossible, use square + tape measure (equal distances from flange face to pipe). Verify no excess paint under level.

3. Preparing the Other End & Fitting the 90° Elbow
Opposite end is straight-cut—no bevel.
- Grind bevel: Start outer edge, grind 37.5° toward inner without crossing (avoids waviness/unsquaring). If wavy after initial grind, face lightly to add temporary landing, re-check square, remove landing.
- Clean 90° long-radius elbow: Remove paint; grind false inner bevel/edge (prevents welder confusion or false NDE readings).
- Fit-up: Use two-hole pins in adjacent bolt holes (not skipped) to orient flange/90 level/square. Level across pins; adjust rotation.
- Gap & align: Spacer for consistent gap; verify high-low/ID.
- Tack & square: 1-inch tacks; remove tools, rotate/check level in multiple planes. Adjust/tack as needed.

Key Takeaways & Safety
- Precision matters: Square bevels, minimal high-low, consistent gap ensure strong, inspectable welds.
- Tools recap: Angle grinder (various discs), flap disc, pipefitter square, level, jack, fit-up clamp, two-hole pins, spacer/high-low gauge.
- Safety: Sparks down, clean magnets, sharp edges, no finger-pinching on jacks, protect flange faces.
- Why it works: Clean prep + alignment = quality root pass; proper squaring/leveling prevents misalignment in spool.
This hands-on demo covers essential shop/field skills for butt-weld setups (flange + elbow). David emphasizes patience, double-checks, and clean work for reliable results. Like, comment, subscribe for more!
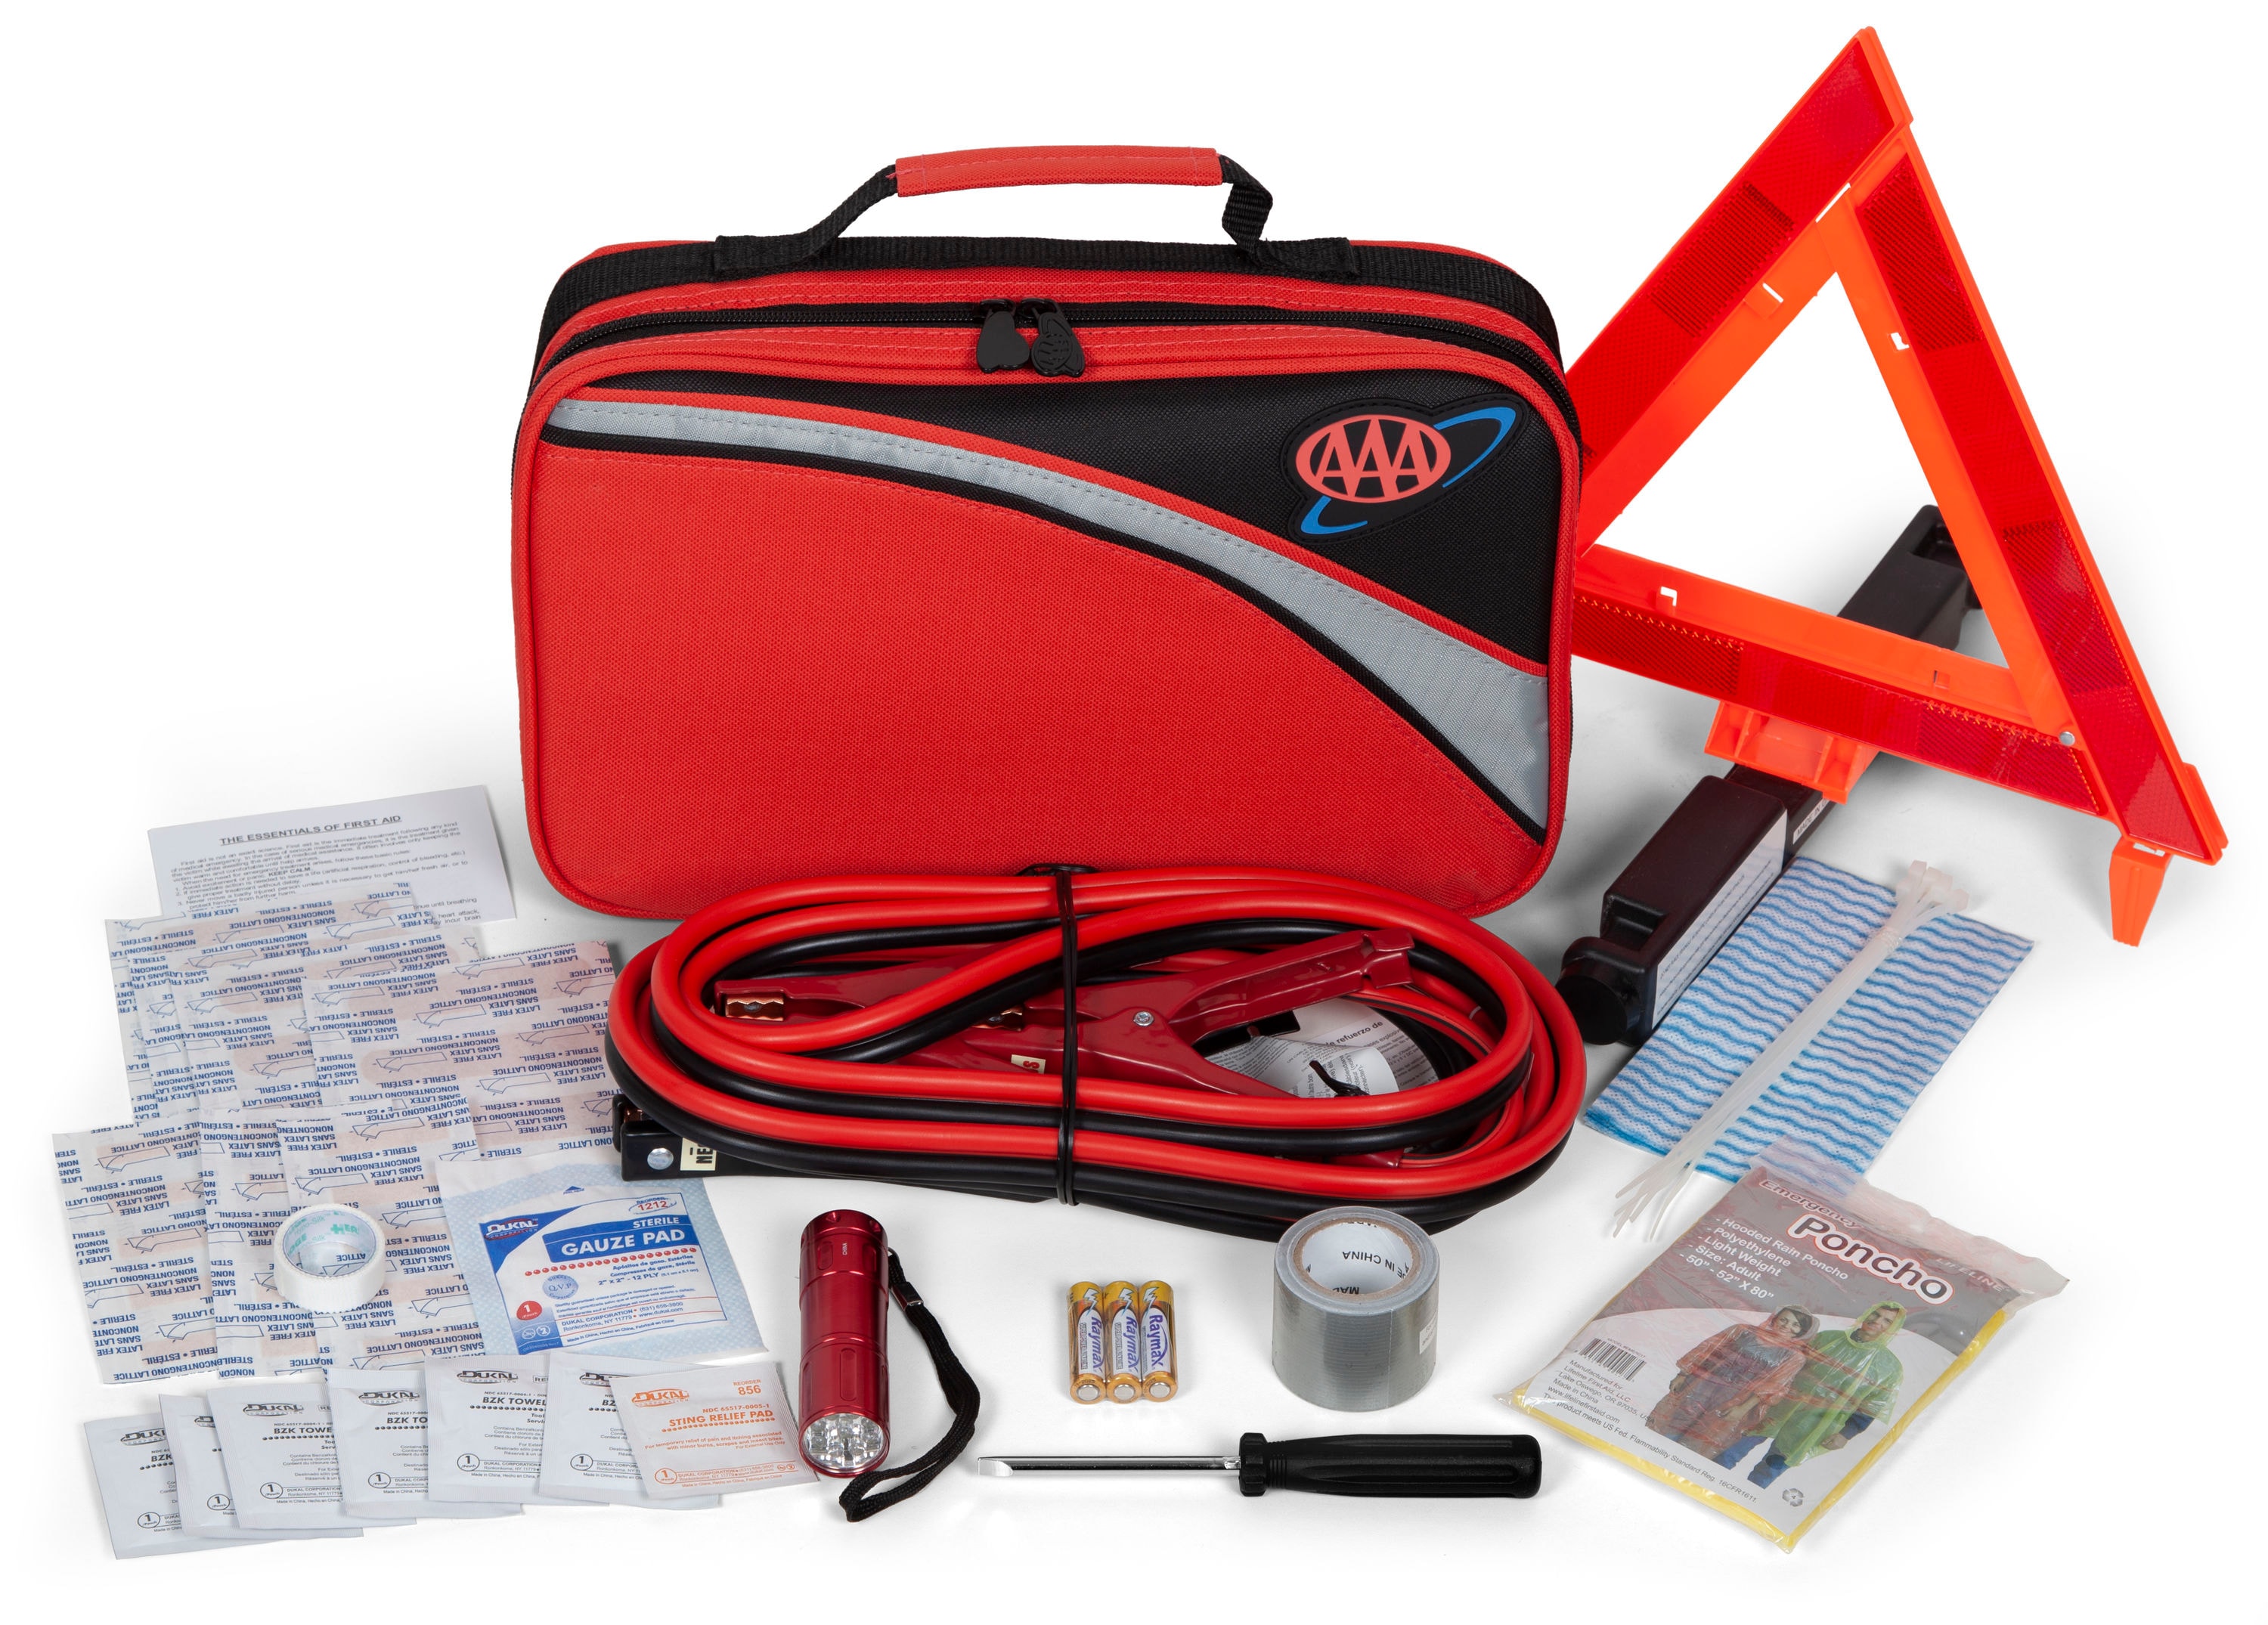
A seasoned roadside assistance operator from Seesaw LLC More Mechanical Roadside Services shares practical, experience-based advice for anyone starting or running a mobile roadside business (e.g., jump starts, lockouts, tire changes, minor fixes—no towing here). The focus is on five essential tools that get the job done reliably, safely, and profitably, especially in cold weather (he mentions 30°F conditions). These picks prioritize durability over cheap alternatives, learned from years of real calls.
1. A Good Floor Jack (Bigger = Better, but Balance Weight)
The foundation for tire changes, under-vehicle work, or lifting to access parts.
- Steel over aluminum — He strongly prefers steel for strength; aluminum is lighter but prone to catastrophic failure under load (he's broken several). Safety first—failure while loaded could be deadly.
- Size trade-off — Larger (e.g., 3-ton or higher) handles trucks/SUVs/semis better, but heavier to haul in/out of your vehicle. Start with what fits your typical calls (Harbor Freight has solid options for jacks).
- Why essential — You can't change a flat or diagnose many issues without lifting safely.


2. High-Quality Lockout Kit (No Cheap eBay Junk)
For unlocking cars when keys are inside or lost.
- Avoid bargain kits — Cheap ones (eBay/Amazon generics) bend, break, or fail mid-job—frustrating for you and the customer. He's pieced together his own after failures, even heat-shrinking handles for grip.
- Invest in pro-grade — Durable tools (long reach, wedges, slim jims) that last. Quality kits handle modern vehicles reliably without damage. (He plans to link favorites later; common recs include Access Tools or similar pro sets.)
- Pro tip — Practice on various cars; a broken tool mid-call wastes time and reputation.

3. Reliable Jump Box / Portable Jump Starter (Money-Maker)
For dead batteries—his top earner.
- High-capacity models — Equivalent to JNC 660 (or higher like 770/1260 series). Packs huge punch (1700+ peak amps), starts cars, trucks, even struggled with semis (pair two for heavy-duty). Holds charge well, lasts years.
- Avoid cheap — Harbor Freight electronics disappoint; go premium for reliability (e.g., Clore/JNC or NOCO equivalents in recent tests).
- Why it pays — Quick, frequent calls (including his own truck). Portable, no cables needed from another vehicle—faster service.
4. Breaker Bar + Quality Sockets (or Impact Wrench Setup)
For lug nuts, bolts, or stubborn fasteners (e.g., tire changes, battery terminals).
- Impact preferred — He uses impacts (1/2-inch or 3/8-inch) to break loose tight lugs quickly—far faster than manual breaker bar. Higher quality = more torque, handles tougher jobs.
- Budget vs. pro — Start basic (breaker bar + sockets), upgrade to impact for efficiency. More investment = faster jobs = more calls per day.
- Versatile — Covers tire work, battery swaps, minor mechanical fixes.
5. Practical Extras: Gloves + Powerful Lights (Visibility & Safety)
Not "tools" but non-negotiable for safety and professionalism.
- Gloves — Protect hands (cold, grease, sharp edges). Remove before entering customer vehicles (no greasy marks); put back on outside. Basic mechanic gloves work; warmth bonus in winter.
- Lights — High-output LED work light (his Walmart brand with strobe mode). Lights up everything; strobe makes you ultra-visible on roadside. Critical for safety—drivers get tunnel vision, distracted/texting. AAA data shows roadside workers face high risk (123+ fatally struck 2015–2021, often high-speed highways, darkness, or impairment factors). Be seen = stay alive.
Final Advice
These five (jack, lockout kit, jump box, breaker/sockets, gloves/lights) cover most calls efficiently. Invest in quality—cheap tools fail when you need them most, costing time, money, and safety. Visibility saves lives—use strobes, wear hi-vis, work fast. He's in the field daily; follow for more tips (seesawauto.com, IG/TikTok @SeesawAuto or similar). Goal: Help people safely, make money, get home to family. Stay safe out there.
Adrian, a single dad from the UK, lives full-time in a converted 2018 Mercedes Sprinter (long-wheelbase, high-roof) with his 12-year-old twins, John and Ella, and their cat Mittens. After a series of life-altering events—losing his partner during childbirth in Thailand, returning to the UK, losing his mother and sister, and growing disillusioned with conventional society—he chose van life to escape the "system" of bills, debt, rigid jobs, and institutionalized education. His goal: maximum freedom, off-grid capability where possible, and deep, daily connection with his children through home education and travel.
Why He Left the "System"
Adrian grew up in a small UK town feeling trapped in low-wage factory and construction jobs. A chance glimpse of a Nepal trekking map sparked his awakening: life could be different. He traveled, built a business in Thailand, met his partner, and became a widowed single dad of newborns. Back in the UK, the return to rent, bills, school routines, and societal pressures felt suffocating. After sobriety and deep reflection, he realized the problem wasn't him—it was the system designed to keep people in debt, distraction, and conformity. Losing family members reinforced that life is too short for a scripted existence. He rejected council tax, water bills, mortgages, and traditional schooling, seeking instead time, autonomy, and real-world learning for his kids.
The Van & Build (~£30,000 Total)
Bought for £15,000 (slightly over budget, but the kids loved the color and features like AC/cruise control). Adrian designed and built almost everything himself, prioritizing space, storage, and self-sufficiency.
Exterior & Off-Grid Features
- 500W solar panels + 460Ah Fogstar lithium battery bank → powers everything (fridge, lights, fans, devices) for extended boondocking.
- 150L fresh water tank (under Ella's bed) + 55L grey tank → weeks of conservative use.
- 40L LPG tank (under van) feeds Truma gas boiler for central heating + hot water.
- MaxxAir fans (multiple, including one in bathroom) for ventilation.
- Extras: roof-mounted LED light bar, reversing spots/camera, hinged fold-up window (usable in rain), modified bike racks for surfboards, external gas BBQ hookup, shore power inlet.
- Truma boiler (chosen over diesel heater for combined space/water heating).
Interior Layout
- Front cab: Swivel seats create living/dining space.
- Kitchen: Dometic fridge, gas hob/oven, deep sink, magnetic knife strip, ample drawers/spice storage, LED lighting.
- Bathroom: Compact wet room with Truma composting/separating toilet, built-in shower (hot via boiler), MaxxAir fan/extractor, clothes-drying rail (uses heater duct for fast drying).
- Ella's zone: Swivel armchair (Facebook Marketplace find), personal table, storage drawers.
- John's zone: Fold-out gaming/eating table sized for laptop + mouse mat.
- Shared living: IKEA cupboard doors, hidden storage (e.g., massive under-chair drawer for cat food/wash bags), LED strips everywhere.
- Bedroom area:
- Ella's cozy "Japanese coffin-style" loft bed (above wheel arches, with hatch, cupboards, blackout curtains).
- Adrian & John's raised double bed (partition for privacy; massive skylight + fly screen above, USB/reading lights).
The build maximizes every inch—storage everywhere, bright yellow/salmon/dark wood color scheme, warm and cozy despite being compact.
Daily Life & Philosophy
- Home education: Kids learn through travel, real experiences, and self-directed interests. Adrian believes traditional schools box children in; his kids socialize with other "free-range" families who are expressive and interesting.
- Finances: No rent, council tax, or utility bills. Income from YouTube ("Life Uncharted") + Patreon keeps them afloat. Life is cheaper and money flows the other way (slowly building savings).
- Favorite part: 24/7 time with his kids—watching them grow, no rushed mornings, shared cooking (John's the chef), closeness without conflict.
- Least favorite: Lingering money worries (common to any lifestyle), but far less pressure than before.
- Future dreams: Fully off-grid land someday, but nervous about permanence. Ultimate goal: live on a sailboat (positive affirmation: "I will").
Reflection
Van life gave Adrian what he searched for: freedom from the system, time with his children, mental clarity, and proof that another way exists. He encourages anyone feeling trapped to break out—"There is no 'can't,' only what you can do." The kids have blossomed, the family is tight-knit, and the van feels like home—warm, comfortable, and truly theirs.
Check out Adrian's channel Life Uncharted on YouTube for more tours, travels, and insights. As he puts it: life is too short to live someone else's map.
Spencer Scott, a former software entrepreneur, spotted opportunity when his Dallas-area neighborhood's trash service tanked after a private equity buyout: poor pickups, double billing, no extras (e.g., items outside bins), and widespread frustration. Instead of complaining, he launched Lone Star Trash—a residential subscription-based pickup service—using startup tactics in a "sweaty" industry. In under two years, it generates $30,000–$50,000/month (estimates vary; first-year revenue ~$300K ARR), with strong margins (~40% in some breakdowns) and near-zero customer churn.
Step 1: Pre-Sales & No-Risk Launch (Zero to $15K in Days)
Spencer posted in local Facebook groups: "The current provider sucks—let's fix it." He offered a no-brainer deal:
- $99 for 3 months prepaid (~$33/month).
- Goal: 200 sign-ups (half the 400-house neighborhood).
- If under 200, 100% refund—zero risk for customers.
- If met, funds buy a truck and launch service.
Within 10–15 days, ~150 people signed up ($15K+ cash). He extended Stripe escrow to delay payout/refund risk. Hit ~200 total in weeks. Transparent pitch: "I've never run trash before, but I know I can do better." Community bought the story—pre-sales funded everything.
Step 2: Sourcing the "Holy Grail" Truck (Under CDL, Side-Loader)
Joined trash operator Facebook groups ("Mom & Pop Trash," etc.). Learned:
- Side-loader (automated arm grabs/tips bins) beats rear-loaders (manual toss, slower).
- Under CDL (no special license needed; lower driver pay).
- Used trucks = massive discounts (70%+ off new).
Found a 2006 side-loader on Marketplace/FB group for $35K (sight unseen; seller sent videos). Financed 100% via Amex personal loan (~$40K at 7% over 10 years, $700/month payment—not equipment-tied). Shipping: ~$5K (empty backhaul via broker). Total startup ~$40–50K (truck + bins + extras), funded by pre-sales + financing—no out-of-pocket cash.
Step 3: Bins & Launch (Used + Rebranding)
Bins scarce—Home Depot won't cut it for bulk. Found used liquidation supplier (BNG Sales) for ~200 polycarts (~$10K shipped, including dirty ones from Tucson). Power-washed in driveway, applied custom stickers. Delivered to sign-ups. Early customers tolerated temporary old branding—community was invested.
Step 4: Growth Levers
- Referrals: Free month credit per referral (one customer referred 16 houses—got a year free). Word-of-mouth snowballs in neighborhoods.
- Facebook Ads: Learned from bin-cleaning operator. Spent aggressively ($300/day initially) to train algorithm; CAC dropped to ~$35–$100/customer. Success page + Stripe pixel tracking key.
- Branded Bins: Rolling billboards every pickup day—free marketing.
- No cancellations (in ~2 years): Service reliability + community story keeps churn near zero. When people move, new owners often sign up (bin stays; easy transition).
Step 5: Scaling & Big Opportunities
- Bought second truck (2020 Heil side-loader) at municipality auction in Wichita Falls, TX: $60K (worth $190K+). Financed 100% (no down payment; ~$1,700/month).
- Auctions = goldmine: Cities replace trucks every ~5–7 years (tax-funded); low-mileage units sell cheap (in-person auctions best—fewer bidders).
- Hypothetical max: One truck could handle ~800 houses/day (dense routes, one dump trip) → ~$210K/month gross at $9/pickup (extreme; realistic lower but still high-margin).
- City contracts: Massive scale (e.g., 20K homes = $800K/month potential). Build reputation first (current micro-city contract); big players (Republic, Waste Connections) dominate, but reliability wins.
Numbers Snapshot
- Revenue: ~$30K–$50K/month (subscription ~$33–$40/home).
- Costs: Truck payments (~$700–$1,700 each), insurance (~$800/truck/month), gas (~$200/day total), driver salary (~$50K/year main driver), bins/marketing/storage (~few thousand/month).
- Margins: ~40% possible (low overhead—no warehouse, minimal staff).
- Startup: Pre-sales + financing = near-zero cash outlay.
Why It Works (and Barriers)
- Recurring + sticky: Trash is essential; bad service creates openings. Bins = permanent marketing.
- Low churn: ~1% monthly (vs. 10–20% SaaS) from moves; often retain address.
- Financing edge: Equipment loans easy (even new biz); auctions = 70% discounts.
- Barriers: Timing (need provider failure), capital for trucks/bins, regulations (permits, dump fees), physical work (though side-loaders automate).
Spencer treats trash like software: subscriptions, pre-sales, ads, referrals. From zero to six figures fast by solving real pain with transparency and hustle. Check LoneStarTrash.com or his socials for merch/updates—classic "sweaty startup" success. If your area hates its trash provider, the playbook's open.
The latest U.S. jobs report for January 2026 (released February 2026) showed nonfarm payrolls rising by 130,000—well above expectations of around 55,000–80,000 and stronger than December's revised +48,000. The unemployment rate edged lower to 4.3% from 4.4%. Job gains were led by health care, social assistance, and construction, while federal government and financial activities saw declines.
Markets reacted positively in pre-market trading: Dow futures up ~270 points (index around 50,543), Nasdaq +218, S&P +41. Inflation data (CPI) ticked slightly lower to 2.4% year-over-year (from ~2.7% prior), below some forecasts—contributing to the "not bad news" sentiment.
Skepticism on Headline Numbers
Panelists (including economist Peter Schiff) dismiss the figures as unreliable and politicized. Key points:
- Government jobs data (BLS) is routinely revised downward—often multiple times. Recent revisions slashed 2025 payroll growth from ~584,000 to just 181,000 (a ~70% cut).
- Historical pattern: Many Biden-era reports initially "beat" expectations but were later revised to misses or outright losses. Panelists argue the economy has been weaker than claimed for years, likely in a protracted recession.
- They extend criticism to the current (Trump) administration: same "lies" about strength, with deficits exploding despite a supposedly robust economy.
Markets confirm weakness, they say:
- Gold surged past $5,000/oz (from ~$2,000 in early 2024), signaling distrust in fiat currencies and debt sustainability.
- USD/CHF hit multi-year lows (around 0.76–0.77), reflecting dollar weakness vs. safe-haven Swiss franc.
- Long-term Treasury yields are rising despite Fed rate cuts—private/foreign demand for U.S. debt is evaporating, forcing more quantitative easing (debt monetization).
AI & Structural Disruption
Luke Gromen highlights a potential secular (long-term) shift: AI/robotics could displace white-collar jobs en masse, echoing the China shock (2000s manufacturing losses of 30–35% after China's WTO entry). Key sectors at risk:
- Healthcare administration (now the top employer in 38 states per NYT 2025 data)—AI excels at paperwork/processing.
- High-earning roles ($100K–$200K) face wage compression or elimination, unlike blue-collar workers displaced by offshore labor.
This clashes with the U.S. debt-based system:
- ~Half of tax revenue from individual wages.
- Consumers borrow heavily (mortgages, cars, credit cards).
- Job/wage losses → defaults → mortgage crisis redux (2007–2008 style), but worse due to higher debt loads.
Peter Schiff agrees AI productivity is positive (raises living standards via efficiency) but warns government distortions (low rates, interference) prevent natural reallocation. The real crisis: sovereign debt/dollar collapse, not just 2008-style financial meltdown. World loses confidence—central banks dump dollars for gold; trade de-dollarizes; U.S. can't finance deficits/trade gaps.
What's Different in Q1 2026?
Peter: We're "further along"—gold breakout, dollar lows, rising yields despite cuts, exploding deficits confirm warnings. Fed lost long-bond control; QE restarted quietly. No "diffusing the bomb"—it's detonating.
Overall tone: Optimistic headlines mask deep fragility. AI accelerates disruption; policy (Fed cuts amid inflation) worsens it. Markets signal trouble via gold/dollar moves, not jobs data. Average Americans face higher inflation, weaker growth, and potential debt crisis impacts on living standards. Panel urges skepticism of official stats—revisions reveal the truth over time.
Tyler, a 28-year-old from Utah County, launched Grind Time Stump Grinding in summer 2024 after hearing a podcast episode on the business model. Within two months, he generated $32,000 in revenue (including $9,000 in his first month while still holding a full-time job paying ~$175K/year). He quit his W-2 role in September 2024 when the side hustle became too demanding to juggle—his schedule was already booked solid, forcing the decision.
Early Revenue & Low-Risk Start
- First month (August 2024, part-time): $9K revenue while working 9–4 at his office job.
- Woke up early (5:45 AM), did morning jobs, changed in office bathroom, parked trailer discreetly, worked full day, then did 2–3 evening jobs (Utah's long daylight helped).
- Felt "embarrassed" at first—wore Carhartt in a Nissan Altima to look the part.
- Second month (full-time): ~$23K revenue.
- Net profit first two months: ~$26K (high margins after equipment costs).
- Worst-case mindset: Equipment (grinder, trailer) holds value; truck could become personal vehicle if it failed. No massive downside.
Core Business Model & Differentiation
Stump grinding removes tree stumps after removals—tree companies hate it (disrupts workflow, extra trailer/setup). Tyler positioned himself as the reliable subcontractor (B2B) while building direct homeowner demand (B2C).
- Pricing:
- $200 minimum (even tiny stumps).
- ~$7/inch diameter (widest point) in Utah; lower (~$3/inch) in tree-heavy southern markets due to volume/competition.
- Example: 18-inch stump = ~$126 + minimum → $200–$350 job (5–30 minutes).
- Multi-stump jobs: $350–$800+ (e.g., 3 large stumps).
- Differentiation:
- Responsiveness — Answers every call/text instantly (even during movies).
- Reviews — Asks every homeowner post-job ("If I did good, could you review?"). Waits awkwardly while they pull out phone—high conversion.
- Backdoor reviews — Early jobs for tree companies; he was last on-site, so homeowners reviewed his business (not the tree company's), building 70–75 reviews fast → #1 Google ranking in Utah County.
- Google Guaranteed/LSA — Pays per lead (~$500–$600/month total marketing); top placement.
- Contractor focus — Tree/landscape/fence/concrete companies hate stumps; he saves them time/money. One contractor paid $25K in 4–5 months.
Growth Framework ("P" Method)
- Piggyback — Sub for tree/landscape companies (scrape lists via Outscraper, cold text/call 20–30 at a time: "What do you do with stumps?").
- Early revenue: 100% B2B for ~6 months.
- Reviews — Systematic asks + backdoor from subs → rapid Google dominance.
- Answer — Phone/text responsiveness crushes competitors (many side-hustlers miss calls).
Current split: ~60–70% direct homeowner (Google), 30–40% contractors (still strong fill-in revenue).
Startup & Risk Reduction
- Tested side hustle — No immediate quit; rented grinder/trailer initially.
- Bought equipment after traction (financed ~$900/month grinder payment).
- Low overhead — ~$4K–$5K/month (truck/trailer payments, insurance ~$400, gas, storage ~$100–$400, marketing ~$600).
- No employees — Solo operation (wears helmet, listens to podcasts).
- Seasonal — Utah winters slow (snow melts fast); found enough work to float.
Mindset & Advice
- No practice needed — Learned via ~7 YouTube videos; first job was real (lucky open backyard). "Don't over-friction—jump in."
- Worst stories — Hit sprinkler line (water sprayed into open window; fixed himself); struck private electric line (sparks flew, thought electrocuted; paid repair).
- Insurance — ~$400/month; no claims yet.
- Freedom — 24/7 control; can take days off, explore other ideas.
- Next — May scale (hire operator) or pivot to bigger service; keeps stump grinding as cash-flow base.
- For broke starters — Rent truck/trailer/grinder daily (~$0 upfront beyond fuel); text/call homeowners/contractors for free; first job pays hundreds.
Tyler embodies "ready, fire, aim": tested fast, iterated, scaled without massive risk. From $0 to replacing $175K income in months via responsiveness, reviews, and piggybacking existing demand. He now sells a playbook/course (with market protections) to help others launch—8–12 people already full-time from it.
If you're considering this: answer the phone, get reviews every time, start as a sub, and jump in—don't over-plan. Stumps aren't glamorous, but the money (and freedom) grows on them.
The Ultimate Guide to Passing the Plumbing Exam (UPC-focused) by Roger Wakefield breaks down key concepts and problem-solving techniques using the UPC Study Guide (where answers are pre-marked, allowing you to read it like a textbook without seeing wrong options). Roger emphasizes understanding why answers are correct through simple visuals and math—crucial for both the exam and real-world work.
Core Strategy: Read the Marked Guide Like a Book
- Open the UPC Study Guide → answers already highlighted/marked.
- Read straight through like a story—no second-guessing wrong choices.
- Builds confidence and reinforces correct facts quickly.
Key Concept 1: Volume of a Cubic Foot
Question: One cubic foot contains how many cubic inches?
Visual & Math Breakdown:
- Draw a cube: 12 in × 12 in × 12 in.
- Face area: 12 × 12 = 144 square inches.
- Volume: 144 × 12 = 1,728 cubic inches.
Memorize:
- 1 cubic foot = 1,728 cubic inches (12³).
- 1 cubic foot ≈ 7.48 gallons of water.
- 1 gallon ≈ 8.34 pounds.
Real-world use:
- Calculate tank weight/footprint (e.g., 10 ft × 12 ft × 3 ft tank on upper floor).
- Convert dimensions (feet, meters, cm) → volume → gallons → weight for structural/load planning.
Key Concept 2: Hydrostatic Pressure (Head Pressure)
Question: Pressure at the base of a 1-inch-high column of water?
Visual & Math:
- 1 foot of water = 0.433 psi (often rounded 0.434).
- 1 inch = 1/12 foot → 0.433 ÷ 12 ≈ 0.036 psi per inch.
Scaling:
- 10 feet = 10 × 0.433 = 4.33 psi.
- 100 feet = 100 × 0.433 = 43.3 psi.
- Any height: height (ft) × 0.433 = psi at base.
Exam & field tip:
- Quick mental math for tall risers, standpipes, or pressure testing.
- Know: pressure increases linearly with height (static head).
Key Concept 3: 45° Offset (Rolling Offset or Simple Offset)
Question: Center-to-center distance for a 45° offset with 4-foot travel?
Visual & Math:
- 45° offset multiplier = 1.414 (√2).
- Travel (set/run) = 4 ft.
- Pipe length needed = 4 × 1.414 = 5.656 ft (≈5 ft 7 in).
Field application:
- Subtract fitting make-up (hub depth) after calculating.
- Avoid eyeballing or trial-and-error—use multiplier for precision.
Roger's Teaching Philosophy
- Draw simple sketches (cube, column, offset) on whiteboard/phone—visualize before calculating.
- Master constants/multipliers (1728, 7.48, 0.433, 1.414)—they unlock dozens of questions.
- Practice breaking problems into basics (area × height = volume; head × 0.433 = psi).
- Use the marked UPC guide to reinforce correct reasoning without confusion.
Bonus Tough Question (Roger's Favorite)
Roger promises to walk through one of the exam's hardest questions at the end (not fully detailed in transcript), using the same breakdown method: draw it, label it, apply basic math/constants. It teaches a new way to think—slow, visual, logical—turning intimidating problems into straightforward ones.
Bottom line: Success comes from understanding principles, not rote memorization. Master volume, pressure, and offsets—these appear in many forms. Draw everything, use constants, and read the marked guide repeatedly. This approach builds confidence for both the exam and jobsite problem-solving. Stay till the end for that tough question walkthrough—it's a game-changer for learning to think like a licensed plumber.
Comments
Post a Comment